What is Chromatic Aberration and How Do You Fix it?
If you've been a photographer for any length of time you've probably seen chromatic aberration before - and you may not even know what it is. It wasn't until I was in college at SAIC that I finally found a name for those ugly little neon green lines that showed up around the high contrast edges in my photographs. I'd been seeing them for years and didn't know what they were called so I could figure out how to get rid of them (also I was a angsty teen who thought I knew everything, but that's another story).
Here's a complicated explanation from Dictionary.com of what chromatic aberration is;
“noun, Optics.
The variation of either the focal length or the magnification of a lens system with different wavelengths of light, characterized by prismatic coloring at the edges of the optical image and color distortion within it.”
In simpler terms?
High contrast areas confuse your lens and leave you with a bunch of colors that aren't supposed to be there. Some people can make chromatic aberration work tot their advantage in their photographs if they know how to manipulate it they way they want, but for me I want to always get rid of it.
Fixing Chromatic Aberration in Lightroom
Take for example this photo from a recent Inspired Chicago feature I photographed of Kira Obermeier (not out yet, but stay tuned)! Her apartment was gorgeous and had tons of natural light which is always great for a photographer, but the problem was that I was shooting with Kira backlit from her bay windows. Not to mention her laptop was sitting in a path of direct sunlight and getting some real funky green patterns on the keyboard.
To fix chromatic aberration in Lightroom you'll want to go into the Develop section and scroll down to where you see Lens Corrections. The sub-section in here that you want is called Defringe, NOT Chromatic Aberration. Make sure that the section flip is switched to on, and then use the little eyedropper tool to find the most vibrant spot of the chromatic aberration. Clickity click, and boom you're done.
Sometimes the eyedropper tool can only get one side of the color spectrum (for this example it got the magenta side). If that happens and there's still some green elsewhere, the tool can have a bit of trouble picking up the slight amount that's left. For this, just play with the sliders of the color that's left in the Lens Corrections box until it's to your liking.
Fixing Chromatic Aberration in Photoshop
1. Camera Raw
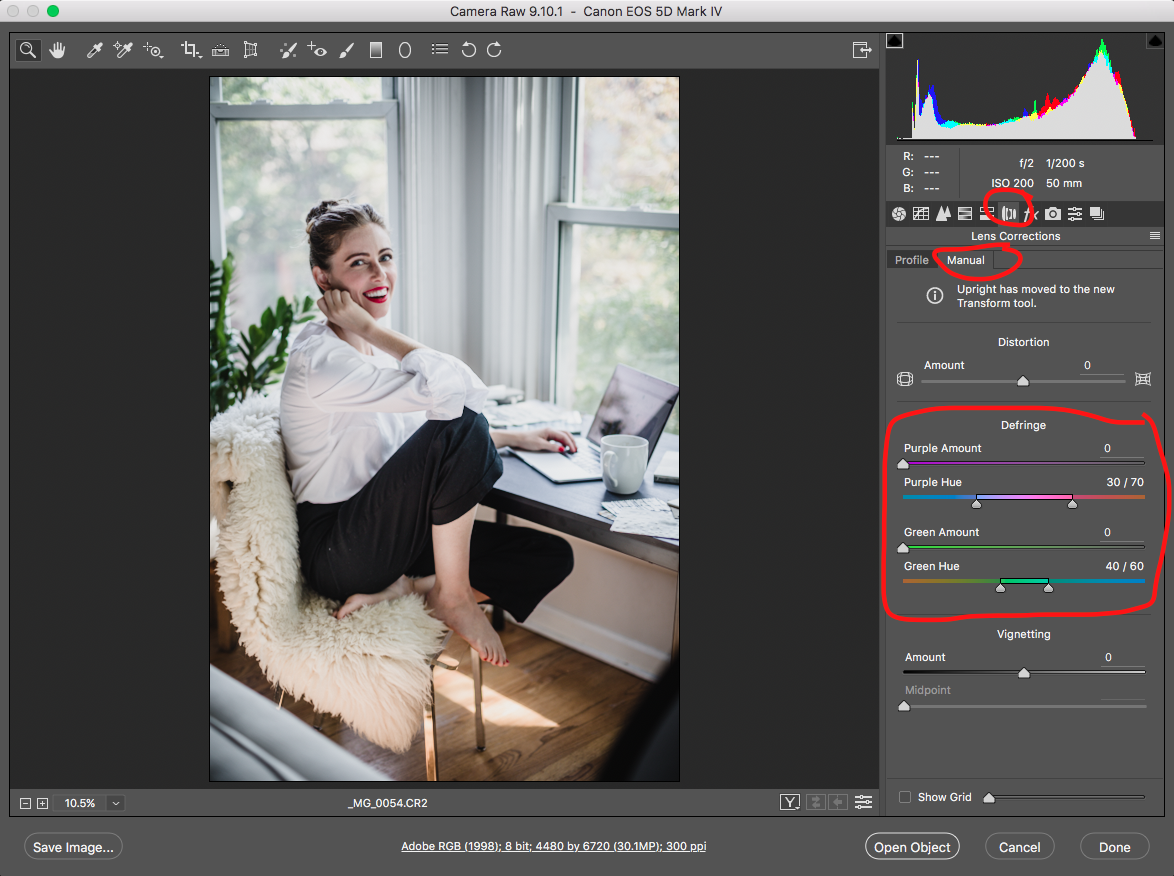
Using Photoshop to fix your chromatic aberration is a little more involved and will likely take more finagling. To get to the section you want, there are two ways depending on the type of file your photograph is. For a RAW file, your computer will open up Camera Raw for you to edit the image before opening it up into Photoshop. In Camera Raw, you're going to go over to the Lens Corrections section like you would in Lightroom and it's still called Defringe, however this time there's no eyedropper tool. If you have a similar issue as you might in Lightroom where the computer grabs only one side of the color spectrum and there's still chromatic aberration you want to get rid of, you'll have to play around with the sliders again. Find the slider that's the color of the chromatic aberration left behind and try pulling it back and forth to see which way gets rid of it the most, this way of dealing with it is truly up to your eyes and judgement.
2. Lens Corrections in Photoshop
If your file type isn't RAW, PNG, or TIFF and you can't open it in Camera Raw (or you just want a little extra elbow room in dealing with chromatic aberration), then you'll use a Lens Corrections filter inside of Photoshop. Under Filters in your main header you'll find Lens Corrections - click it and a new window will open.
In this section it actually IS called chromatic aberration. But like I said, it's a little less user friendly than the other options, because there's no eyedropper or colors to tell you what you're adjusting (knowing the color wheel is helpful in this part). Similar to using Camera Raw, you'll have to play around with the sliders and see what looks best with your image because it changes based on your own personal preference and what the photo is of.


